I get a little confused while changing into Road Column, marching and back out again. Can you explain exactly how this works?
Sure! Great question. The process is simple, it can be a little tricky to keep it straight in your mind while doing it. This is how I do it:
It takes 1/3 move to change formation. While in Road Column, you move double. So I think of it this way: you have 6 little, 1 third segments that you can use during your turn; at Road Column speed, right?
So let’s say I’m sitting on a road but I’m in line. I have a total of 6 segments to use right? It takes 2 of those moves to change into Road Column. That means I have 4 moves left to march along the road.
How far can I go if I want to change back into Line? Well, just remember it is going to take 2 of those little moves to change back right? So if I’m already in column, on the road, I can move 4 moves along the road and then spend my last 2 to change back into line.
So how far can you move if you start on a road, change into column and then back out into line again at the end of my move? Simple. It takes 2 moves to get into column right? It will take 2 more to get back into line at the end of your move. So that means you can use 2 moves to march along the road.
That’s fine but that works out to be 2 thirds of a regular move right? If you are going to do that, you might as well just stay in line and march there. It works out the same if you are going through bad terrain.
This is a good base line to keep in mind. In order to make it worthwhile, you need to be moving further than 2 thirds of a regular move; assuming you are getting in and out of road column all in the same turn.
Do you plan your moves differently? That’s ok. If you already have a way that makes sense to you fine. Keep doing it that way, as long as it works. There are different ways to think about it.
There are probably over a hundred board games on the Battle of Gettysburg, so why another. Well that is exactly the point.
The game we will be looking at is an adaptation, or a descendant, of the original Kriegspiel. The game information will have to come second to perhaps fulfillment of a long time dream.
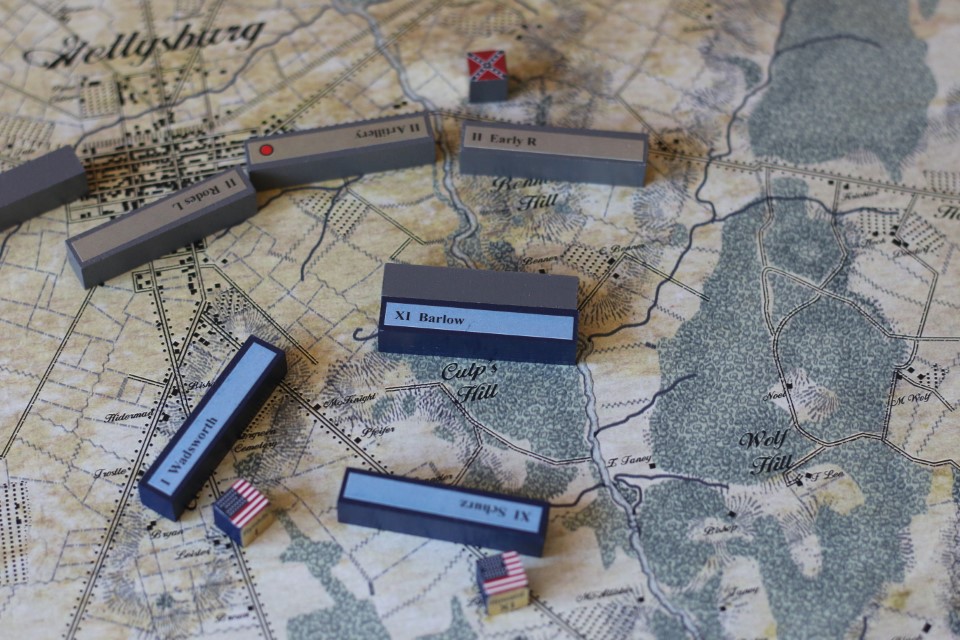
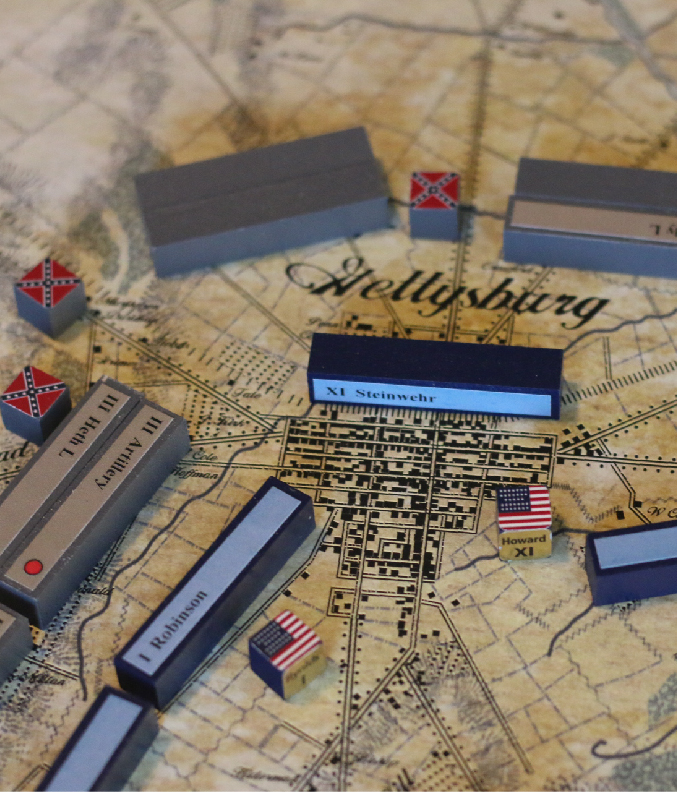
This is a picture of a ‘light pull chain’ defending a valley, and in the mid 1960’s to me it was state of the art for wargaming. I collected every one I could to add to my growing army of them. As you can see, with the bed covers formed just so, you can create any terrain you want. You can also form your army units (chains) in any shape possible. They can also represent any army from ancient times to the 20th century. They can be armed with firearms or sword and shield; it does not matter. Why, you ask, am I bringing this up? Because I have been looking for a game that reminds me of wargaming with my chains, and I think I finally have one in Pub Battles: Gettysburg. To be more exact, I think all of the Pub Battles games will do. So, on to the game.
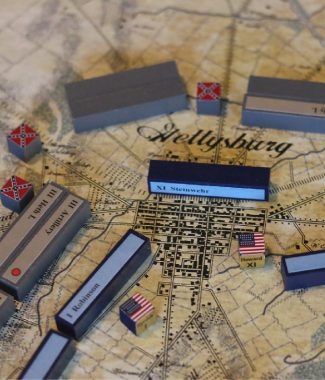
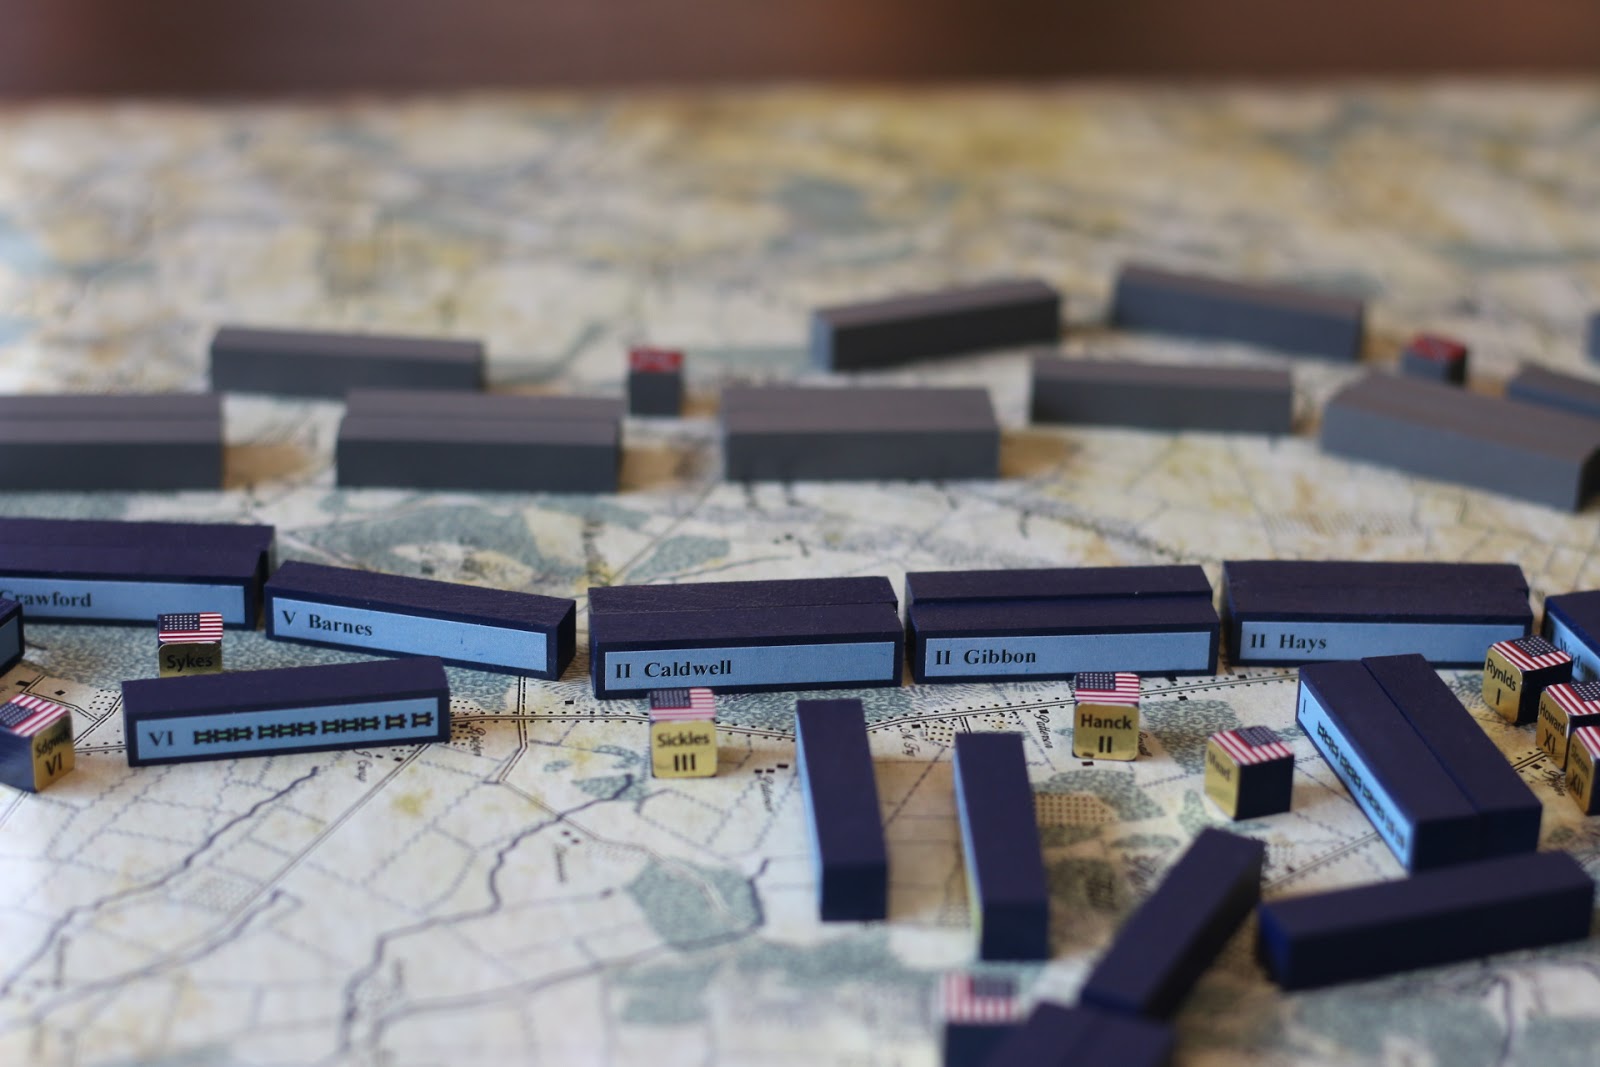
The Pub Battle games all have a few things in common. First, they are relatively easy with only about four pages of rules. Second, they do a good job of showing how units had to march and fight historically. Third, they are beautiful beyond compare. The maps are all period ones that have been enhanced by Command Post Games to be easier for players to use. The map not only looks good, it actually feels good. You wouldn’t be surprised to see it come out of a museum case. It is rolled up when you receive it, however it flattens right out without adjusting or counter-folding by the player. The map is more of a time machine than just a wargaming map. It allows your mind to wander when playing so you actually believe that you have Hood, Hancock, and Meade around the table with you. The counters, while really only wooden rectangles, have the same effect. Once they are on the map it feels like von Moltke is in a chair nearby looking on approvingly.
This is what comes in the game tube:
Pub Battles Rulebook Pub Battles Gettysburg Rulebook Six small die and one large (all six sided) 24″x24″ Paper map (you can order a canvas map, and per Command Post Games one is being used in a museum exhibit) Six small Light Chain Pulls (coincidence?) to be used to calculate Rates of March. You can also get wooden ones. Black and Gray rectangular, and square blocks Myriad of stickers for the above
I will post this write up from Command Post Games:
Units realistically sprawl out in road column, resulting in delays, snaking and traffic snarls.
Baggage Trains add to the traffic and congestion problems. They have to be protected but also need to be kept close to the action to properly supply the troops.
Realistic, chaotic move sequence. Your troops don’t move when you want them to. You don’t know when exactly when your troops or the enemy will move. As the commander, you can only try to speed them up or slow them down. If that fails, you have to react quickly with contingency planning.
Chaotic move sequence also results in massive re-playability. You will never see a game open and develop the same way twice. However the timing works out, you must adapt to the situation at hand.
Realistic Fog of War: blocks hide exact unit strength and type. You can also hide your reserves off board. This forces players to realistically screen and probe. You can never be certain as to how close you are to breaking the enemy. Are they out of reserves or can they still reinforce their line? Where are they strong? Are they massing for a counter attack?
The detailed narrative generated by the tense game play makes for great solitaire games.
Combat and movement models are based on accurate, military, combat data from the period: Kriegsspiel.
Optional rules for multiplayer team play.
Optional written orders are both fun, easy to implement and very realistic. These are great to use with multiplayer teams. They also greatly enhance solitaire games.
Sophisticated and deep strategy. There are tons of decisions to make every turn. Every one of them must be weighed against possible advantages / disadvantages to you and the enemy. Players must consider how the timing of moves will impact other commands and the enemy.
The game looks to be easy, but that is deceptive. The addition of the different optional rules make it both deeper and more historical. Please one favor though, rules lawyers do not apply. This is a game where you and your opponent will need to be gentlemen and come to agreements over movement and the battles. The one thing about this game is that it will get crowded with pieces in different places. On a Gettysburg map that is going to be the ‘fish hook’. The rules are very clear, but because of the compression effects on the units it sometimes gets a little hazy as to exact unit placement. When that happens, it can either be a rules fight fest or a friendly compromise on the issues that may arise. Remember that its forbearer Kriegspiel did have umpires.
There are probably over a hundred board games on the Battle of Gettysburg, so why another. Well that is exactly the point. It has never had the Command Point Games treatment. So, even an old jaded campaigner will look at the battle through fresh eyes. The game is simple, but in its own way it brings to life the problems of command in that era. The price point for the game is not cheap. However, were you to be able to hold the components in your own hands and feel the quality, you would immediately understand. There are a lot of stickers that need to be applied, so keep that in mind. They are also harder to apply correctly on the rectangles than when you are putting stickers on a block game. Someone who is a stickler (sorry) for having things just so will need extra time and more patience than usual with setting up this game.
Gettysburg allows you to play all three days as separate games, or a campaign with night turns. You also get three what-if scenarios. First, Jackson was not killed at Chancellorsville. Second, Jackson was wounded at Chancellorsville, but arrives in time for the battle. Third, J.E.B. Stuart is present at the opening of the festivities. Victory conditions are cut and dried. A Player receives one Victory Point for every enemy piece destroyed. The player with the most points wins. There are a few Gettysburg only rules. These are:
Treat all creeks as Streams. All Cavalry are dragoons: they roll only 2 dice. Both Confederate and Federal HQs have a rating of 3.
This is the sequence of play:
1. Place all Command Chits in a cup. 2. Pull a Command Chit randomly from the cup. 3. Move pieces from that Command 4. Repeat Steps 2 & 3 until cup is empty. 5. Resolve Combat between all enemy pieces in contact. 6. Start a new Turn.
So, how does it play? It is a lot of fun, and strangely very deep, in a very historical way. With the game being a chit pull one, you will never know what to expect to be able to do or what your opponent can do. The main rule to keep in mind is listed in bold “Move where the majority of the piece can fit”. The piece is in one type of terrain: the type under the ” majority of the piece”. HQ pieces move first and then you determine command ranges There is an optional rule where Baggage Trains can be added. These really add to the historical flavor especially in their uncanny ability to clog roads. The designers suggest that after you get the rules down to add ‘Optional Hidden Reserves’ to the mix. For example, the pieces of a corps if in reserve would be hidden in their HQ unit. As long as the HQ unit is not spotted by the enemy they can lay in wait like a rattler waiting to pounce. To find an entire corps pop up over a ridge that seemed safe is extremely disconcerting. There are also rules on multi-player with special rules dealing with teams that try to cheat, so beware. Thank you Command Post Games for allowing me to review this almost hidden gem of a game.
Pub Battles Question: When do pieces become Fresh? At the beginning of every turn?
This is an important distinction to draw. No, regular combat pieces only become Fresh again when and IF they Rally. You may end up fighting the entire battle and never Rally a piece but we don’t recommend it.
A piece can only Rally during Movement, by NOT moving. Instead of making a move, it spends the time Rallying.
Don’t confuse this with HQs. We turn HQs to their Spent side to show they have already attempted to Alter this turn. You can only do that once per turn. Because of this, we do turn up all HQs to Fresh, at the beginning of every turn.
We have 2 Brandywine games. A Kriegsspiel version and a Pub Battles version. Which one is better? How do they compare? This post was prompted by a great question:
I have been looking at your Brandywine games in detail: The Kriegsspiel and Pub Battles version. Both games look fantastic. Pub Battles seems a bit pricey.
What would you recommend between these two?
Manuel
Great question. It depends what you are looking for. I’ll try to summarize the advantages here:
Fast Play time. You can setup and knock out a game in less than 1 hour.
Small Map size. Easily fits on a small table. Easy to transport and play at a bar, park or restaurant.
Because the map is smaller scale, the area to the Colonial left is expanded. This game allows the British the option to flank from either side. In this way, I think it allows for a truer command feel by the Colonials. They have no idea where the British will attack from. A true sense of surprise.
Canvas Map option. The ‘pricey’ version comes with the canvas maps. That’s what real maps from the period were made from. They are amazing quality, durable and water resistant. -Great for spilling drinks. Note that this is an option. You can get the regular paper map for only $62.66 right now. The Kriegsspiel sets all come with paper maps.
Standard 2 player format. No Umpires needed. You can play with up to 6 players.
This is the better option if you are new to the hobby or looking for a game to teach new recruits.
True Kriegsspiel Rules. Fully compatible with the original Reisswitz, Prussian Kriegsspiel. You can play this with multiplayer teams and umpires etc.
Pub Battles Rules option. We ship this with Pub Battles rules. Alternatively, this converts the game into a full blown, detailed, traditional, 2 player wargame. Check out the Review tab here for a player report on how this works.
Smaller scale. This matches true Kriegsspiel scale but the map it huge! It does give you more detail and finer control as far as being able to form your lines along tree lines and slopes. Also more detail in actual contact and types of combat.
This is the better option if you have time, space and are looking for a more detailed, standard type wargame.
Tom recently sent this in as a player’s guide and variant for our Kriegsspiel Brandywine Scenario. It is a fantastic supplement! Our Battalion rules allow you to fight this out as a detailed Pub Battle. Fast, easy and very dynamic. We need to further develop this into a whole new series!
Every time I play the KS games reinforces the unique nature of this addition to your family of games. These games offer a completely different dynamic from the standard Pub Battles offering, capturing the flow of each battle much more effectively, and offering deep insights into the circumstances and outcomes of each modeled battle. They represent a truly new departure for your game system, and one that will, in my view, prove very attractive to both new and veteran military board gamers.
I’d like to see a more robust framework for game play in this KS series. KS Bunker Hill is better than KS Brandywine in this respect, but still doesn’t provide enough information for the players to launch into the game without a lot of additional research.
I think this is pretty easy to fix, and have attached what I put together for KS Brandywine. This version has been refined by multiple games, and I think provides a pretty good, “stand alone” start point for purchasers of KS Brandywine.
Thanks, Tom
Kriegsspiel (KS) Brandywine Scenario with Pub Battles Rules (using Version 2.92 Rules)
Command Additions. For the British, Cornwallis and Knyphausen, as wing commanders, act as “extra” army commanders for their respective wings, in addition to commanding directly the troops identified immediately under them on the loss rosters. Subordinate commands for Cornwallis are Mathew (Guards and Grenadier Brigades), and Grey (3rd and 4th Brigades); Donop (Hessian Brigade) is directly subordinate to Cornwallis, and activates with his headquarters. Subordinate commands for Knyphausen are Grant (1st and 2nd Brigades); Stirn (Hessian Brigade) and the three battalions of the 71st Highlanders are directly subordinate to Knyphausen and activate with his headquarters. Only Howe, Cornwallis and Knyphausen can roll to change turn order, for themselves or for any subordinate under their respective commands (and within command range), on a roll of 4 or less. All commanders (except Howe, who may be activated with any British command) have a “chit” n the command cup (but see Order of Appearance, below). British elite units include all three units of the 71st Highlanders (71, 72, and 73), all British Grenadiers, and the Foot Guards.
For the Americans, Washington is the Army Commander and also commands the troops directly under the “Reserve” on the loss roster. Subordinate commands are Sullivan (including Stephen’s and Sterling’s Divisions), Greene, and Wayne. All commanders have a “Chit” in the command cup, but only Washington can change turn order, for himself or for any subordinate within command range, on a roll of 4 or less. Defeat numbers for the two armies are 18 for the British and 14 for the Americans. You will need to make additional commanders blocks for this, as well as “commitment” chips, which are not included in the game.
Combat ineffective numbers are 50% of infantry and cavalry units (combined) for each command according to the rosters (the three British Light Infantry battalions are included under Cornwallis for determining combat ineffective percentages).
Historical Order of Appearance. Knyphausen’s command begins the game deployed on the map anywhere south of Wystar’s Ford and west of the Brandywine, with the exception of the 1st and 3rd Battalions of 71st Highlanders – 71 and 73 unit labels, respectively. These are optional units, which enter the turn following any movement by an American unit west of the Brandywine creek (these units historically were assigned to guard Howe’s baggage trains, and did not take part in the battle). Cornwallis’ wing (with Howe) enters the game map on turn one as the first units to activate, crossing the Brandywine in road column at Jeffries Ford, in the following order: Mounted Jagers, British Grenadiers, Light Infantry Brigade, Hessian Jagers, Foot Guards, Artillery, Hessian Grenadiers, 4th Brigade, 3rd Brigade, and 16th Dragoons. Chits for Cornwallis’ subordinate units are not added to the command cup until turn two. The game ends following the end of turn ten.
Light (including Jager) Infantry. Light infantry units are exempt from all command rules, and can be activated with any friendly command. Bombardment attacks against light infantry have a -1 modifier. Light infantry units have all around facing, cannot be flanked and disregard fields of fire – that is, they may advance into enemy fields of fire without moving into actual contact, and do not exert fields of fire themselves. Spent light infantry units may not rally in an enemy field of fire, however.
Light Infantry Fire Combat. During the combat phase, light infantry units that are not in actual contact with enemy units (either attacking or being attacked) can “fire” (once) at any enemy unit within one third infantry movement that is not in contact with another friendly unit (bombardment attacks likewise cannot target enemy units in contact with other friendly units). The light infantry unit rolls two dice; normal combat rules apply (including cover). After the light infantry fire is resolved, non-light lnfantry or dragoon units that are targeted by light infantry fire may return fire (regardless of target unit facing), also using two dice, but resolve their fire with an additional -1 modifier. Light infantry units firing at each other resolve their fire simultaneously, with no additional modifier. Light infantry units that retreat from combat during the combat phase (voluntary or involuntary) cannot also fire. The three American skirmisher units are NOT treated as light infantry.
Road Column. For infantry and cavalry, per the KS Brandywine Scenario Pub Battles rules, there is no movement cost to enter or leave road column. However, a unit may enter or leave road column at the beginning or the end of its turn only (NOT both). Mark a unit in road column by stacking a baggage train block on top (baggage trains are not used in the Pub Battles version). For especially long columns, stack a baggage train marker on the first unit in the road column. Artillery DOES expend 1/3 movement cost to limber OR unlimber, and can do so more than once – for example, limber, move one third move, and then unlimber. Limbered artillery is always considered to be in road column.
Stacking and the “combined Division”. There is no “stacking” in the Pub Battles version. Supporting units are placed adjacent to the rear of the supported unit, just as in normal Pub Battles games. The only “stacking” that occurs is by column markers on top of the lead unit in the column. Disregard the “combined Division” rules in the KS Scenario addendum. Treat Infantry, artillery and cavalry blocks just like any infantry, artillery or cavalry block in pub battles, moving and fighting independently.
Terrain Notes. Fields of Fire remain 1/3 Foot movement, and Artillery Ranges remain one foot move (about three quarters of a mile). Disregard the “bridge / ford” rule – movement across a bridge or ford still reduces movement, if the unit is not in road column.
Tracking losses and “Combat Ineffective” status. The larger numbers of physically smaller unit blocks makes determining combat ineffective status a bit of a chore. The easiest way to do this is to use the Loss Rosters. Simply move destroyed units to the loss roster, on top of their unit strength. You will be able to see at a glance which commands have become combat ineffective as the game progresses.
OPTIONAL Movement Rules. At the much larger 1:8000 scale, and with smaller (one half inch) blocks, the original Pub Battles Terrain rules are simple and easy to apply. To use the original rules, apply a one third movement penalty for each terrain type. Always allow a unit to move one third movement regardless of terrain (except for rivers, which can still only be crossed at a ford). If a unit has already been reduced by one third, and it encounters other terrain requiring further reduction, it halts immediately. (I strongly recommend using this rule – it takes greatest advantage of the superb Pub Battles maps, and forces the players to analyze and use terrain in the same way as the actual army commanders).
Victory Conditions. Calculate victory at the end of the game: 1 point for every enemy unit destroyed, plus three points for the British if they control one of the two major roads (control=no American units within 2/3 foot move of the road). The Americans receive one victory point if rebel losses are less than 50%.
You are usually defeated when you suffer 50% losses in Pub Battles. That sounds clear but 50% of what exactly? What if there are reinforcements that have not yet arrived on the field? Do they count? Is it 50% of your entire army combined or 50% of just the forces in play on the field so far?
Answer
Count only the forces in play on the field so far. So as new reinforcements arrive, your total strength and 50% loss number goes up. This bolster’s your army. You can fight longer and take more losses now.
To me, it’s not at all complicated to distinguish an Infantry unit from a Cavalry unit in PBs. There’s such a thing as carrying “minimalism” too far, to the point of “bland.” I might order a Scotch without water, but water without Scotch is simply rehydration.
We are very fortunate to have such a talented and knowledgeable group of play testers in our design team. We have great discussions. I often wish they were public. This is a small example. Just 1 email picked out of hundreds of our banter back and forth. I hope you find it as interesting as I do!
Sorry to differ, but saying Artillery in PBs is “not an abstraction” beggars reason. The Artillery units in PBs don’t represent 1-2 guns—I know you know this, of course—but these units also don’t represent “usual concentrations” except in the sense of portraying sections of the battlefield where Artillery is particularly focused/targeted (and at this, Artillery Range, from the physical location of the Artillery unit to the targeted unit, is still an abstraction—those guns would be firing from other in-range locations, not just in a hub-to-hub line of cannon).
Troops were very accustomed to Artillery “falling silent and withdrawing.” It happened all the time. Batteries redeployed at the orders of the Division or Corps commander to which they were assigned; batteries withdrew when ammunition-depleted; batteries shifted location sometimes when particularly effective counterbattery fire (actually rare in the ACW; Federal batteries firing on Alexander’s concentration on Day Three were ordered to hold fire by Hancock in order to preserve rounds for the infantry attack he knew was coming) began to impact them adversely (usually in terms of a caisson exploding or an unsustainable number of horse losses in the battery).
Batteries might even just fold and fall back in the face of an attack (Infantry was very accustomed to orders to “Save the guns!”). Such things did not disconcert any but very green troops.
Re ACW cavalry, most infantry never saw them engaged on a battlefield. The bitter slogan “Who ever saw a dead cavalryman?” reflected not only infantry’s contempt for cavalry (especially in the Federal Army, at least up to Gettysburg) but the fact that ground-pounders rarely saw cavalry in action—they were more likely to be deployed to the infantry’s rear with orders to shoot any man who routed (there is a statue of a dismounted Federal cavalryman, kneeling with carbine at the ready, right behind the “High Water Mark” position at G’burg! He was NOT there to personally help repulse Pickett’s Charge.)
John Buford
Reynold’s troops saw some casualty in Buford’s battle area, but understood that the troopers had bought them time to come up with tactics and with blood. They were hardly shaken at the sight of a couple dozen troopers in their immediate front (despite the phrase “shattered brigades” in the text narrative at the end of the “Gettysburg” movie, Buford’s division had not been shattered, only wearied; they were withdrawn to Westminster to replenish ammunition, draw rations, re-shoe horses where needed and rest, and were very much involved in the pursuit after G-burg—read the account of Buford’s no-nonsense handling of a Southern spy captured between Westminster and the Potomac).
JEB Stuart
On the Southern side, Confederate infantry may have thought more highly of Jeb Stuart for the reputation he had built, but were singularly unimpressed with his Gettysburg Campaign wagon-train-raiding shenanigans. But they were not shaken by his defeat by Custer on the East Cavalry Field, they didn’t even see it—it was out of sight and virtually out of the hearing even of the left-flank Confederate infantry.
The destruction of Pickett’s Division and failures of Pettigrew’s and Trimble’s infantry, coming after the “flat finish” of the second-day Confederate infantry attacks, are what really shook the ANV (and its commander) as never before.
This last not to undermine your statements vs friendly dragoons in the AWI, but out of genuine curiosity: where are some sources I could read re Infantry liking “having dragoons around” and the “infantry line” becoming unnerved at the dragoons’ absence?
Teachers at military schools around the world are now using Pub Battles in the class room for training.
Many hobbyists enjoy the Pub Battle series as a fast and simple board game. Don’t let the short rule book fool you. This game system is a serious model of military conflict.
Rather than focusing on the detailed complexity of comparing unit morale and weapon systems, Pub Battles focus on command decisions in a chaotic and unpredictable battlefield.
Though it functions well as a two player game, it was originally designed for multiplayer use: cooperative teamwork with limited communications. A perfect platform for training groups in a classroom.
D. O’Connel has been using Brandywine to train Marine facilitators and school staffs in training workshops at Pendleton, Parris Island, Lejeune, and elsewhere.
We are currently working with him to design a game specifically made for classroom training with the USMC.
D. O’Connell is a military historian, world-recognized teacher of decision games, and Senior Learning and Development Consultant for the Cognitive Performance Group. From 2012-2016, he led the efforts of Marine Corps University’s Case Method Project to institutionalize the case method at The Basic School (TBS), the Marine Corps’ school for newly commissioned and appointed officers. His duties at TBS included developing decision-forcing cases (DFCs), regularly teaching DFCs to students and staff, and conducting workshops for students and staff on DFC development and facilitation. O’Connell also served as the project’s lead for all work with the Infantry Officer Course, the Schools of Infantry, and the Fleet Marine Force.
O’Connell’s DFCs, in addition to seeing extensive use at TBS, have been integrated into the curriculum of several Marine Corps courses, including the Infantry Small Unit Leaders Course at both Schools of Infantry and the Sergeants Course, which runs at each of the six Staff Non-commissioned Officer Academies.
Outside of his work with the Marine Corps,O’Connell has presented multiple times at the Royal Norwegian Naval Academy, the Swedish Defence University, the Finnish National Defence University, the Estonian National Defence College, the Baltic Defense College, the US Naval Academy, and the FBI National Academy, among others.
By now, Austerlitz was supposed to be out. Ancient Pub Battles was supposed to be out. Germantown should be on the cusp of being released and 1st & 2nd Manassas should be ready for summer. What’s the hold up? Rules!!!
Before all of these new releases, we wanted to clarify and adjust a few things in the rules. We figured this would be a 1-2 week process. Wow were we off. Instead it developed into a raging and fierce debate among the design team and play testers. Months later, we are still at an impasse.
A play tester proposed a new approach to combat. This new method seemed to resolve many issues we were wrestling with, while simplifying and clarifying the rules to boot. Devout factions have now formed for and against this new proposal. Some love it. Some hate it. What should we do?
We would greatly appreciate input on this. Would you like to help us resolve this? We need more eyes on it.
I don’t want to lay out the details here in advance as that can bias and color your reception of the idea. Here’s how you can help:
Download the new proposed rules here. This is only a proposal. This is NOT the official Pub Battles 3.0 update. This is also a first rough draft. Expect formatting errors.
Print them out and play at least 3 complete Pub Battles games with the new rules. Try to keep an open mind. We all naturally resist any and all change at first. We are hard wired that way. You won’t like these at first just because they are different than what you are used to. It will seem strange and awkward. From my experience, it gets easier once your mind adjusts. It is not bad, just different.
Give us some feedback by answering the following questions in comments below. You can send us a direct email if you prefer and feel free to add any other comments you may have.
Questions
Do you like this approach better than the previous edition?
Do you like this approach better than the original edition? (no FoE restrictions)
Is this proposal consistent with the original Pub Battles concept? Simple, quick and realistic.
Does this approach add more or less complexity?
Does this approach make the game less fun, intense, or enjoyable?
Does this approach make the game take longer to play? (once you are used to it)
I have just completed another game of Gettysburg, and this was a Union Major Victory (Confederate concede on turn 7 of Day 2 with ten blocks lost).
First off, for simplicity purposes, I count all blocks no matter the type. In this particular game all losses were infantry and both elites were lost.
I find that Gettysburg has a certain flow. On day 1, Lee has a shot at a major Victory. This is a little misleading as he actually has the smaller force for the first half of the day, and not much more than the Union by the end of the day.
Lee may have a chance on the first few turns of Day 2, but somewhere the tide turns. When that has happened is the critical point of the game, and the one that tests the player’s judgement.
If the South switches to the defensive a turn late, they can lose quite quickly. If they switch too soon, they might miss a chance at a major.
Switching from a desperate bid for victory, to a cool withdrawal, is such a major shift in thinking that it more frequently results in pushing too long.
Frequently, the game then becomes very tense for the Union player, as now they hold the cards. They must push Lee over the edge without ending there themselves.
This is made tricky by approaching night. Come morning, Lee will have had a chance to recover, and Stuart will arrive!
In the best games, Lee manages to wrest initiative away from Meade, as the game see-saws back and forth.